Color & Texture Collide
by Gina Morgan
 Have any of you ever had a client sit in your chair, and during the consultation, you realize that what the client is requesting, is something you’ve never done before? And not only have you never done it before, you aren’t even sure it can be done? That is exactly what happened to me about 15 years ago, when a new client sat in my chair. She was in town from California, wanted a perm and hi light and had to leave to catch a plane to head home in an hour and a half!
So, I had a dilemma; do I turn her away and tell her it’s not possible or do I attempt it, knowing she probably won’t be back anyway since I live in Illinois and she lives in California? Well, being someone who has never been afraid to “color outside the lines,” I decided I could do it! And of course, she didn’t know I hadn’t performed this service many times! Hairdressers are the best actors and actresses in the world!
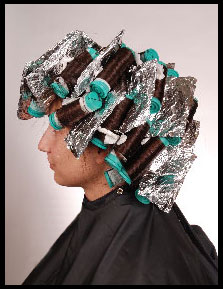
I knew I only had a total of 90 minutes to perform both a perm and a highlight, and the only way I could do both, was to do them both at the same time! She had short hair, so I figured I had a chance! I knew I had to weave the foils just right, and wrap the perm rods directionally. I also knew the foils had to be done neatly, and when I applied perm solution, it too, had to be done neatly.
Again, I didn’t know if it would work, and after over 15 years of doing this service, hairdressers always ask, “what if the perm solution gets in the foils?” I have also heard “she only does that on stage, definitely not on real clients!” Well, guess what? I do this service on clients all the time! And it works every time! I have never done a “Color and Texture Collide” that didn’t turn out awesome! And that very first lady that I “practiced” on…. LOVED IT! Her hairdresser in California called me to ask what it was that I had done. I explained it to her, but of course, she thought it was impossible! Needless to say, when she was back in town, she came back!!!!!
After doing this technique many times in the presence of Dr. Hunter, what we came up with is the fact that I’m not messy. I think that’s the secret! AND using the ProDesign perm. I will share the reasons “why Controlled Effects?” later.
And just because you are doing two services in the time it would take to do one or the other, doesn’t mean you charge less! You charge full price for the perm, full price for the color service, and full price for the haircut! Talk about making double the money in half the time! That is “working smarter, not harder”! And remember, this isn’t a service just anyone is doing! Be sure your client knows how awesome you are!
That gives you a little background on the origination of “Color and Texture Collide.” Following is a step by step “how to,” along with pictures of a model we did at “Expressions” in Oak Brook, IL in 2009. Her name is Natalie… So enjoy!
Happy “Color and Texture Collide!”
Gena
Step By Step Instructions
- Shampoo hair with ProDesign Cleanse Shampoo and towel dry
- Saturate hair with Tiger Reconstructor and dry into hair 110%, either with blow dryer or under hood dryer
- Weave color/bleach with proper foil placement
- Wet down hair not in foils, and wrap in perm rods according to desired finished result
- Check foils to see how color is doing
- Mix Tiger Structurizer into perm solution, pierce top with a pin and apply to rods
- Place plastic cap over rods and foils
- Check perm / check color
- When perm is processed, blot rods thoroughly with paper towels
- Rinse perm rods with warm water and very low water pressure
- If color is done processing at this point, remove foils and rinse as you rinse the perm rods – if color is done
processing prior to perm being done, spray foils with water and Tiger Reconstructor – place a towel next to
each foil as you spray – this is to stop the color or bleach from processing any further. If color is not done,
just rinse the rods, not the foils. - Towel blot perm rods
- Spray rods lightly with Tiger Reconstructor – if you are dealing with hair that is multi porosity or was
“compromised” prior to service, put client under dryer and dry Tiger Reconstructor on rods - Apply Neutralizer – process 5 minutes
- Rinse entire head with lukewarm water and very low water pressure
- If you need to “tone” at this point or if you are doing a “color overlay”, you can apply over the entire head
and process per manufacturer’s directions - Rinse. If you need to shampoo, use Tiger Reconstructing Shampoo
- Apply Tiger Moisture Mist
- Finish hair as desired!

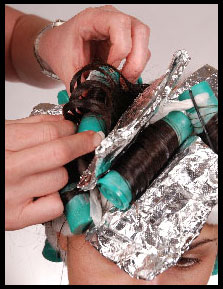
- Weave through each section, the top of the “weaved section” is left out for the perm rod, and the bottom “weave” is the one you put the foil in. Natalie’s hair was previously color treated, so she had bleach and 20 volume developer in the foils. I did the foils first, then went back and put the perm rods in.
- Start by weaving an angle up to the crown from the outside corner
of the eye, again, the top is left out for the rod and the bottom you put the color or bleach on.
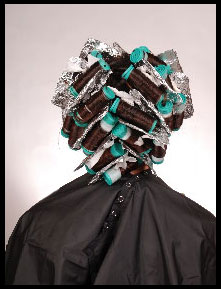
- Notice the angles are in a “herringbone” pattern.
- “Lift and lay” – unwrap the rod right where it is, the hair will come up off the rod. If it lays over, it’s done! Most chemically treated hair or extremely porous hair processes in 5 to 7 minutes!

- Once the perm was completed, we did an overlay with a demi permanent color, level 7 with a red undertone. That’s the awesome thing about the ProDesign perm…. you can perm and color at the same time, and/or color right after the perm! The hair will be shiny and in better condition then when you started! You can even shampoo the same day with ProDesign shampoos!
Contact ProDesign International at 1-800-235-7376 with any questions or comments.